

Blog
want to take a crack at your injuries from home?
Check out our blog posts and find the topics specific to you
Topics:


How I fixed my knee pain (and then crushed a 47 km run)
How I fixed my knee pain and ran 47 km!
Last year I couldn't run.
In September 2023, a friend and I ran the Juan De Fuca on Vancouver Island. It was an awesome experience. 45 km, 2000 m of elevation and 13 hours.
But in July of 2023... I could barely hike downhill. Forget running.
I was dealing with a long-standing knee injury, that came back when I increased my downhill running.
At the time, we were living up at Silver Star. The trails up there are incredible. They're exciting and flowy, and a true joy to run.
They are also uphill or downhill in just about every direction.
This meant that every single run I was hammering downhill, which is a surefire way for me to trigger my knee pain.
My injury is likely my meniscus. I have an old twisting injury that has given me issue in the past.
It shows up as pain along the inside of my knee that SPIKES with downhill strides. It's sharp, and intense and can often take my breath away.
So... when this came up again, with Juan De Fuca already on the calendar, I took it seriously.
Here is the strategy I used:
RESET.
RESTORE.
RELOAD.
Before we get to that, we need to understand why running injuries happen in the first place.
Whenever we experience a running-related injury, we are dealing with an overuse injury. We did too much too soon.

WE ALL HAVE AN INJURY THRESHOLD.
No matter how fit you are, we all have an injury threshold. For you, it might be 25 km. For the next, it might be 10 km. For another, it could be 100 km.
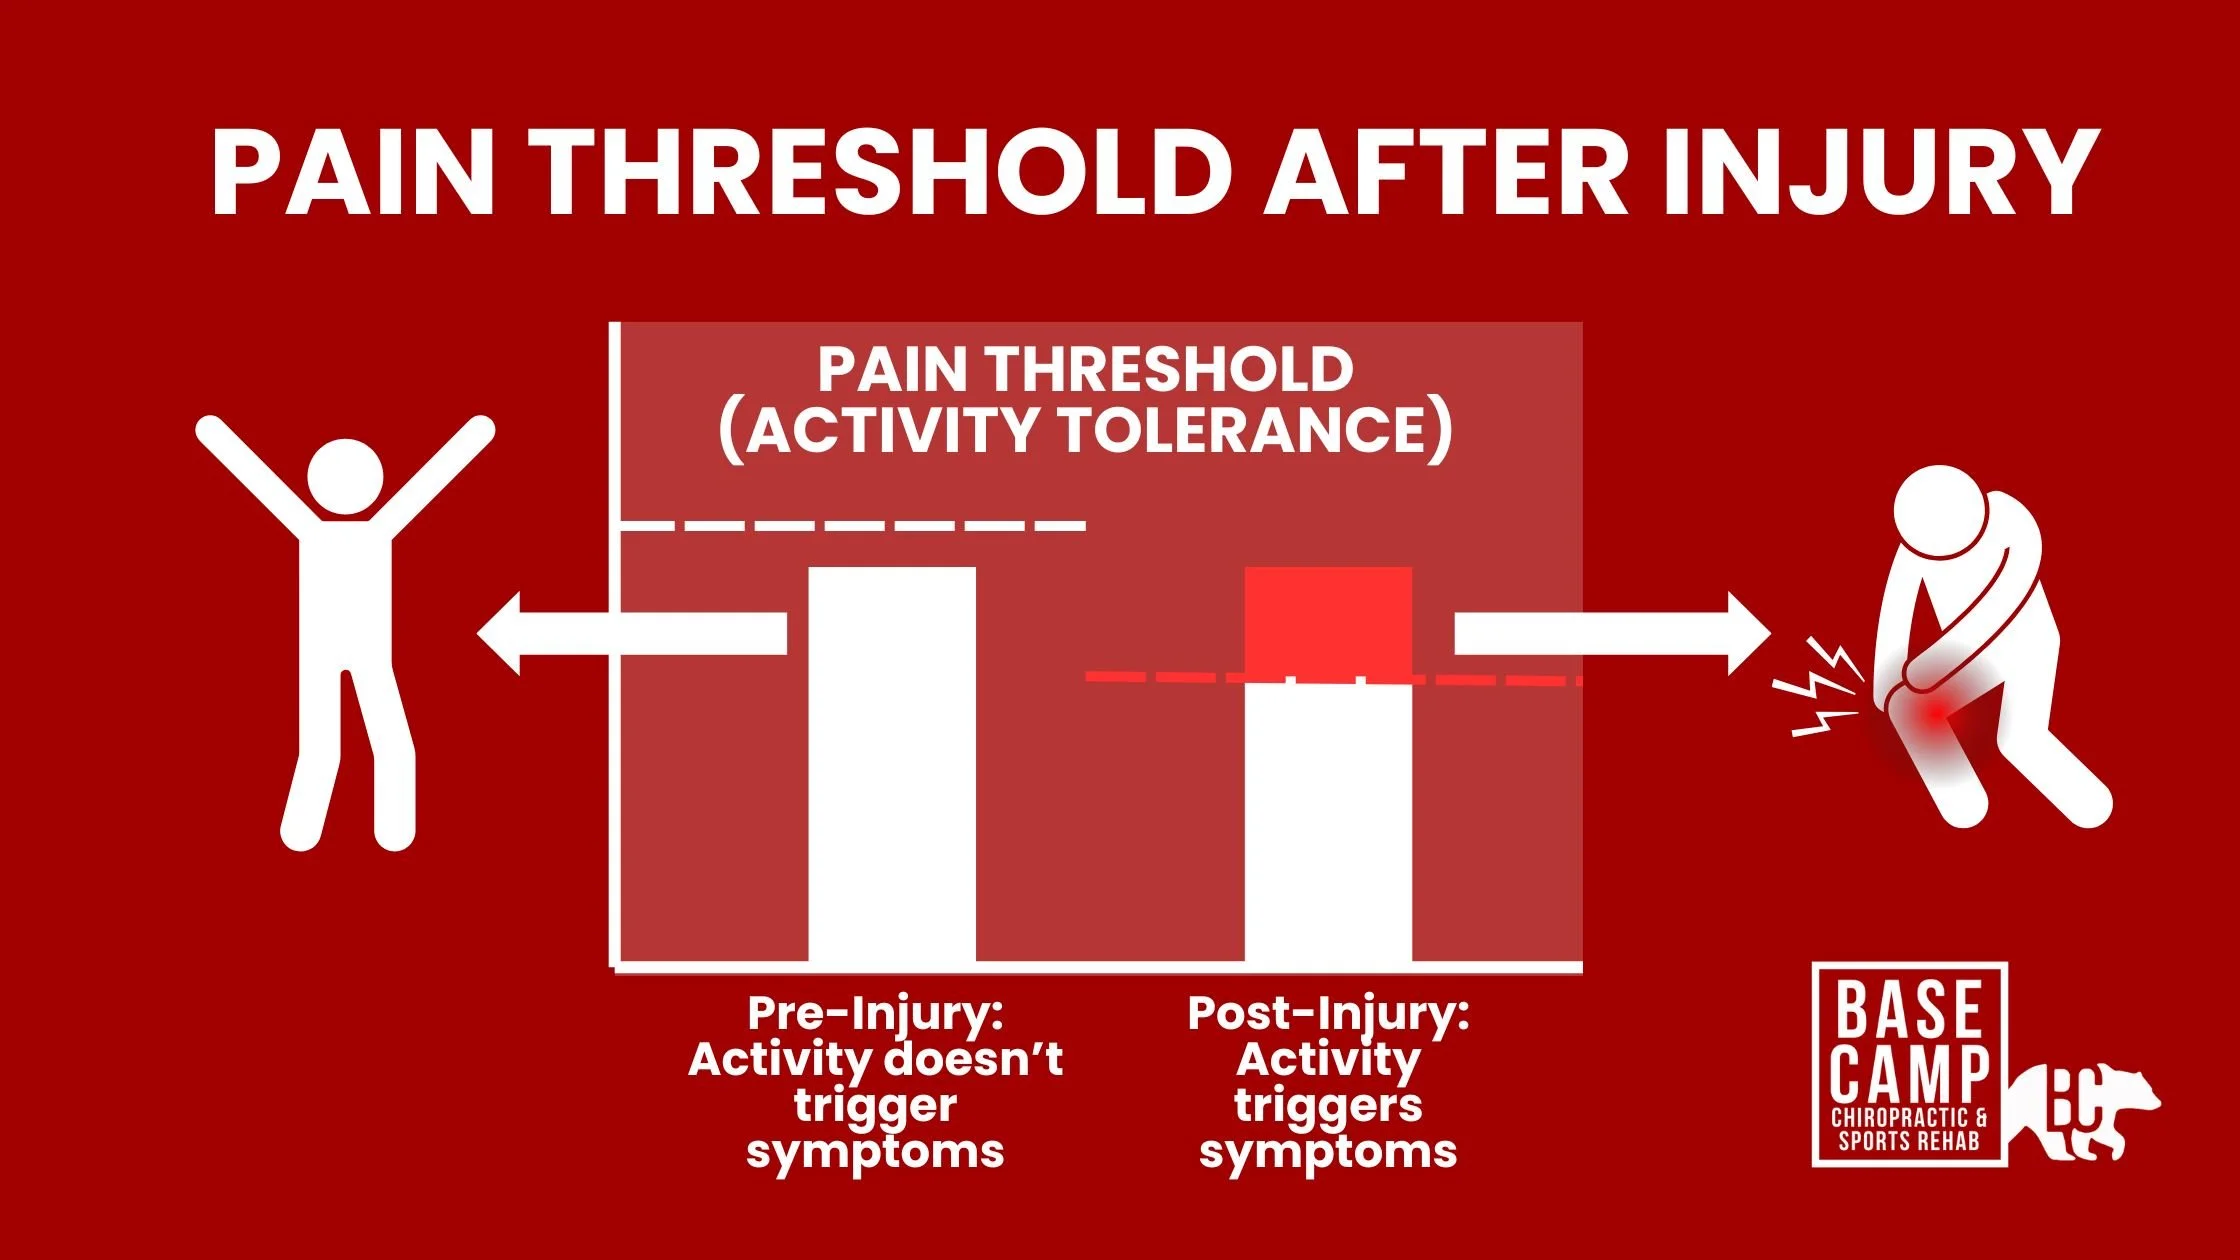
AFTER AN INJURY…
After an injury, that threshold is lowered. We can no longer handle the same amount we could before we triggered the injury.
Here is exactly what I did to fix my knee pain and successfully conquer the Juan De Fuca in a single day:
Step 1: RESET.
This meant rest... but not complete rest.
I still had to train for the 45 km trail run with almost 2,000 m of elevation gain.
But... I couldn't. Instead, I focused on what I COULD do: flat running and strength training. I focused on continuing to build my leg strength so that when I did return to smashing downhill I was strong enough to do so.
In the CALM IT DOWN phase, my main goal was to maintain fitness and strength, while letting my pain triggers lessen.
Step 2: RESTORE.
The goal of Step 2 was to build my tissue tolerance (the resilience of my knee) up beyond the demands of a 10 hr day.
In order to return to running the distance and terrain I wanted to, I knew I needed to build my strength, endurance and tolerance back up.
Since I had been already working on my leg strength, I was in a good spot.
I added in some specific exercises (in this case step downs, pogos, and adductor planks) to target the muscles and parts of the knee that needed it the most.
Step 3: RELOAD.
Then came the fun / nerve-racking part... running downhill.
Thankfully, I had put in the work and was ready to get back to running downhill with speed.
I reintroduced it gradually, on moderate trails, before turning on the jets.
I was lucky because I didn't experience a single flare-up. I was ready for Juan De Fuca.
Result?
Juan De Fuca was a blast (big thank you for the weather on that one).
Now?
It still bothers me on occasion.
But that is inevitably when I have neglected my rehab exercises. I started to experience sharp knee pain and need to add in a few weeks of consistent strength movements.
Here are the takeaways...
When you have pain, take it seriously. Do something about it!
When you are injured, you will need rest. Relative rest doesn't mean you can't do anything, it means you need to do less and modify.
STRENGTH is your ARMOUR. It's your bank account, your insurance policy, and your treatment. It will get you back to activity faster than anything else.
If you are struggling with how manage and treat your injuries, we can help.
-Dr Mark Murdoch
Chiropractor, MS Sports Medicine

Dr Mark Murdoch is a runner, chiropractor, and rehab specialist in Vernon, BC.
Every week he works with runners, mountain bikers, and adventure athletes who want to get back to their sport better than ever.
Request a free consult with him here: CONTACT

Tips for Running in the Heat
How I fixed my knee pain and ran 47 km!
It was 39 degrees yesterday.
As the summer sun blazes and temperatures rise, runners face unique challenges that can impact performance and safety. In this post, we delve into the science behind running in the heat and offer practical tips to help you navigate your summer training effectively.
Understanding the Heat's Impact on Running
The shift to hot weather running presents immediate physiological challenges. Heat increases cardiac output demands, forcing your heart to work harder to maintain circulation. This results in elevated heart rates even at familiar paces, making zone-based training adjustments crucial for maintaining performance goals.
Managing Hydration and Performance
Dehydration compounds these challenges, reducing blood volume and hindering your body's ability to cool itself through sweat. Simply drinking water isn't enough; replenishing electrolytes lost through sweat is essential for muscle function and temperature regulation. Electrolyte-infused fluids can help maintain performance and prevent heat-related issues.
Sun Exposure and Protection
Sun exposure poses another risk, especially for those unaccustomed to intense sunlight. While sunscreen is recommended for most, some runners find it affects their ability to sweat effectively. Instead, opting for UPF-rated clothing can provide protection without compromising cooling mechanisms, ensuring you stay comfortable and protected during extended runs.
Practical Tips for Summer Running
Adjust Expectations: Understand that running in higher temperatures will affect your pace and endurance. Adjust training plans accordingly to avoid overexertion.
Hydrate Smartly: Incorporate electrolyte-rich fluids to replenish losses from sweat. Focus on maintaining hydration levels before, during, and after your run.
Protect Your Skin: Choose lightweight, UPF-rated clothing to shield against UV rays while allowing for adequate ventilation.
Know Your Limits: Monitor your body's response to heat and adjust your running schedule or intensity as needed to prevent overheating or exhaustion.
Cool Down Effectively: After running, prioritize cooling down with a cool shower or ice packs to lower core body temperature and aid in recovery.
Take home message:
Summer running offers unique challenges, but with proper preparation and awareness, you can continue to enjoy and excel in your training regimen. By understanding the impact of heat on your body and implementing these practical tips, you'll stay safe, perform better, and make the most of your summer miles.
Whether you're training for a race or simply maintaining fitness, embracing these strategies will ensure that your summer runs are as enjoyable and effective as possible. Stay cool, stay hydrated, and keep moving forward in your running journey!
Dr Mark Murdoch is a runner, chiropractor, and rehab specialist in Vernon, BC.
Every week he works with runners, mountain bikers, and adventure athletes who want to get back to their sport better than ever.
Request a free consult with him here: CONTACT

How to Train your Core for Running
How to train your core for running
I had two conversations with patients last week that reminded me of something that I take for granted.
Most of us have been told we should 'strengthen our core'
Ok...
...but what does that even mean?
And why is it even relevant?

Because you can't fire a cannon from a canoe.
The results of this would be... comical.

Instead, we want to fire our cannons (i.e. our LEG POWER!) from a BATTLESHIP.
The stronger your core, the more stable and efficient your legs can function to propel you forward.
This is why core strength has always been such a popular topic for runners. IT MATTERS.
Not only for performance, but for injury prevention too.
But... where should you start?
My favourite test to put runners through is the Side Bridge Endurance Test.
This test targets the lateral core, which helps stabilize us EVERY SINGLE STEP so that our legs can propel us forward.
It is a common spot that will fatigue, which is why we see so many marathon and Ironman competitors coming across the finish line looking like wet noodles.
I use this test with runners every single week.
STANDARDS
When we set our standards, it depends on what the goals are.
For the general population, just to prevent lower back pain, I like to see a 75-second hold in anyone under 40. We get a bit more lenient in 41+, but shooting for a 75-second hold is a great goal.
For RUNNERS though, I have a high standard, depending on your distance.
10 km: 75 seconds
25 km: 90 seconds
42.2 km: 1 min 45 seconds
50+ km: 2 min+
Here is where it gets tricky... we don't train the lateral core by doing a bunch of long hold side planks... because the core doesn't hold tension the whole time you are running.
Instead, it stiffens and relaxes with every step.
Instead of holding the side bridge for minutes at a time, I have my patients and clients hold it for 10-30 seconds and then repeat with a short rest (2-5 seconds) in between.
This trains not only the core endurance but also the contract, relax, contract cycle.
We also use things like lateral bends, suitcase carries, and step-ups to train the same function.
For my serious runners, some sort of lateral core training needs to be in your program EVERY SINGLE WEEK.
Add this in and you will see some serious performance gains.
-Dr Mark Murdoch
Chiropractor, MS Sports Medicine
P.S. Need to get in touch with us or have any additional questions?
Give us a call at (250)-307-7819 between 8am-5pm Monday-Friday, or email us at drmurdoch@basecampclinic.com
Dr Mark Murdoch is a runner, chiropractor, and rehab specialist in Vernon, BC.
Every week he works with runners, mountain bikers, and adventure athletes who want to get back to their sport better than ever.
Request a free consult with him here: CONTACT

Strength Training 101 for Runners
Strength Training 101 for Runners
This one is for the runners.
This weekend, the Slay the Dragon trail race kicked off the season at Silver Star mountain resort.
Watching the runners come in, I saw something I always do at these long races: almost no one is coming to the finish line out of breath.
EVERYONE at the end of a 50 km race comes across the finish line limited by MUSCLE FATIGUE, and not cardiovascular fatigue. (Except maybe the top 5%).
What does this tell us?
Distance runners are RARELY limited by their cardio on race day.
Distance runners are (almost) always limited by their strength.
If you’re serious about your running game, you probably already know that strength is the secret sauce for performance and injury prevention.
But where should you begin your journey to becoming a stronger, more resilient runner?
Well, it all starts with calf endurance.
Think of running as a series of thousands of calf raises in rapid succession, as you leap from one foot to the other.
To gauge your calf raise endurance, we use the Single Leg Calf Raise Endurance Test.
Here is how to test your calf raise endurance:
How much calf endurance is enough?
Here are some benchmarks tailored to your distance goals:
5 km : 15 reps
10 km : 20 reps
15 km : 25 reps
25 km : 35 reps
50 km+ : 50+ reps
If you're not hitting these numbers, it's time to start working on your calf endurance today.
Trust us; it can lead to rapid improvements in your running performance.
A Comprehensive Approach to Strength Training for Running
But what if you want a more comprehensive approach to strength training for running?
Strength training programs for runners can be complex, but in general, we need to strengthen 4 key areas:
Hip Strength
Knee Strength
Calf Strength
Core Endurance
Regularly targeting these areas, assuming you're lifting with sufficient intensity, will set you on the path to building and sustaining your running strength.
If you're unsure where to begin or crave a structured approach to strength training for running, our Run Strong program is your answer. Check out this page to join when the next group starts: www.runstrong.ca
-Dr Mark Murdoch
Chiropractor, MS Sports Medicine
Dr Mark Murdoch is a runner, chiropractor, and rehab specialist in Vernon, BC.
Every week he works with runners, mountain bikers, and adventure athletes who want to get back to their sport better than ever.
Request a free consult with him here: CONTACT
TIBIAl torsion: how this regular anatomical variation Can Impact Your Running, Squatting, and Lunging
How Tibial Torsion Can Impact Your Running, Squatting, and Lunging: What You Need to Know
If you've ever noticed your feet turning inward or outward while walking, running, or working out, you might be dealing with a condition known as tibial torsion. This rotational alignment issue of the tibia, the larger bone in your lower leg, can have significant effects on your performance and comfort during physical activities. Let’s dive into what tibial torsion is, how it affects your running, squatting, and lunging, and what you can do about it.
What is Tibial Torsion?
Tibial torsion refers to the twist in the tibia bone, and it comes in two flavours:
- Internal Tibial Torsion: Here, the tibia twists inward, making your feet point towards each other. It's common in young children and often resolves as they grow, but for some, it sticks around into adulthood.
- External Tibial Torsion: In this case, the tibia twists outward, causing your feet to turn out. This is more common in adults and can be linked to hip issues or compensatory changes in your lower limbs.
How Tibial Torsion Affects Running
Running with tibial torsion can feel like driving a car with misaligned wheels—it’s possible, but it’s not efficient or safe. Here’s how it breaks down:
Internal Tibial Torsion:
- Your feet turn inward, increasing stress on your knees and ankles.
- You might experience overpronation, where your foot rolls inward too much, leading to pain and potential injuries.
- Energy transfer is less efficient, making you slower and more fatigued.
External Tibial Torsion:
- Your feet turn outward, disrupting your natural gait.
- This misalignment can lead to overuse injuries like shin splints and iliotibial band syndrome.
- Compensatory mechanisms kick in, altering your form and reducing your running efficiency.
The Impact on Squatting
Squatting is a staple in any fitness routine, but tibial torsion can throw a wrench in your form:
Internal Tibial Torsion:
- Knees tend to collapse inward, known as valgus knee positioning.
- This increases stress on the inner knee and can lead to pain and injury.
- Weight distribution becomes uneven, making it hard to maintain balance.
External Tibial Torsion:
- Knees face outward, often leading to a wider stance.
- This places extra stress on the outer knee and hips.
- Squat depth and stability are compromised due to improper muscle loading.
Lunging with Tibial Torsion
Lunges demand stability and alignment, both of which are challenged by tibial torsion:
Internal Tibial Torsion:
- The lead leg rotates inward, stressing the knee joint, particularly the ACL.
- You might feel unstable, increasing the risk of knee injuries.
- Maintaining proper form becomes a struggle, affecting your balance.
External Tibial Torsion:
- The lead leg rotates outward, putting stress on the hip and knee joints.
- Compensatory patterns emerge, such as excessive hip rotation.
- Force distribution is uneven, potentially leading to muscle imbalances and injuries.
What You Can Do About It…
Dealing with tibial torsion involves a mix of targeted exercises, physical therapy, and in severe cases, surgery. Here’s a game plan:
Conservative Treatments:
- Work with a rehab chiropractor or physical therapist to strengthen the muscles around your hips, knees, and ankles.
- Use orthotic devices to correct foot alignment and reduce joint stress.
- Engage in gait training to improve your walking and running mechanics.
- Focus on exercises that enhance flexibility and strength, ensuring proper alignment during squats and lunges.
Surgical Options:
- For rare, severe cases, an osteotomy (surgery) might be necessary to realign the tibia.
- Post-surgery rehab is crucial to restore function and strength.
Wrap up:
Tibial torsion might sound like a complex issue, but understanding it is the first step towards managing it effectively. By recognizing how it impacts your running, squatting, and lunging, you can take proactive steps to address it. Whether through targeted exercises, physical therapy, or more advanced interventions, there's a path to better performance and reduced pain. Embrace the journey to stronger, more aligned movement!